Album Settings
PixoProof Academy: PixoProof Album Settings Explained: Access, Security, Selections, Expiry, Downloads & Watermark
Album Settings control how clients access, view, and interact with an album. Through settings, you configure everything from gallery PIN security and selection limits to download permissions and dynamic watermarks.
To access settings, open an album from your Albums page and select the Settings tab from the album navigation. Changes on the Gallery Settings, Downloads, and Watermark tabs are applied only when you click Save settings in the bar at the bottom (the Gallery design tab has its own Publish look button); Discard changes reverts unsaved edits and Reset to defaults restores the album's original settings (still requiring Save settings).
Gallery Settings
The Gallery Settings tab manages client access credentials (under Gallery Access), selection parameters, expiration deadlines, and client interaction permissions.
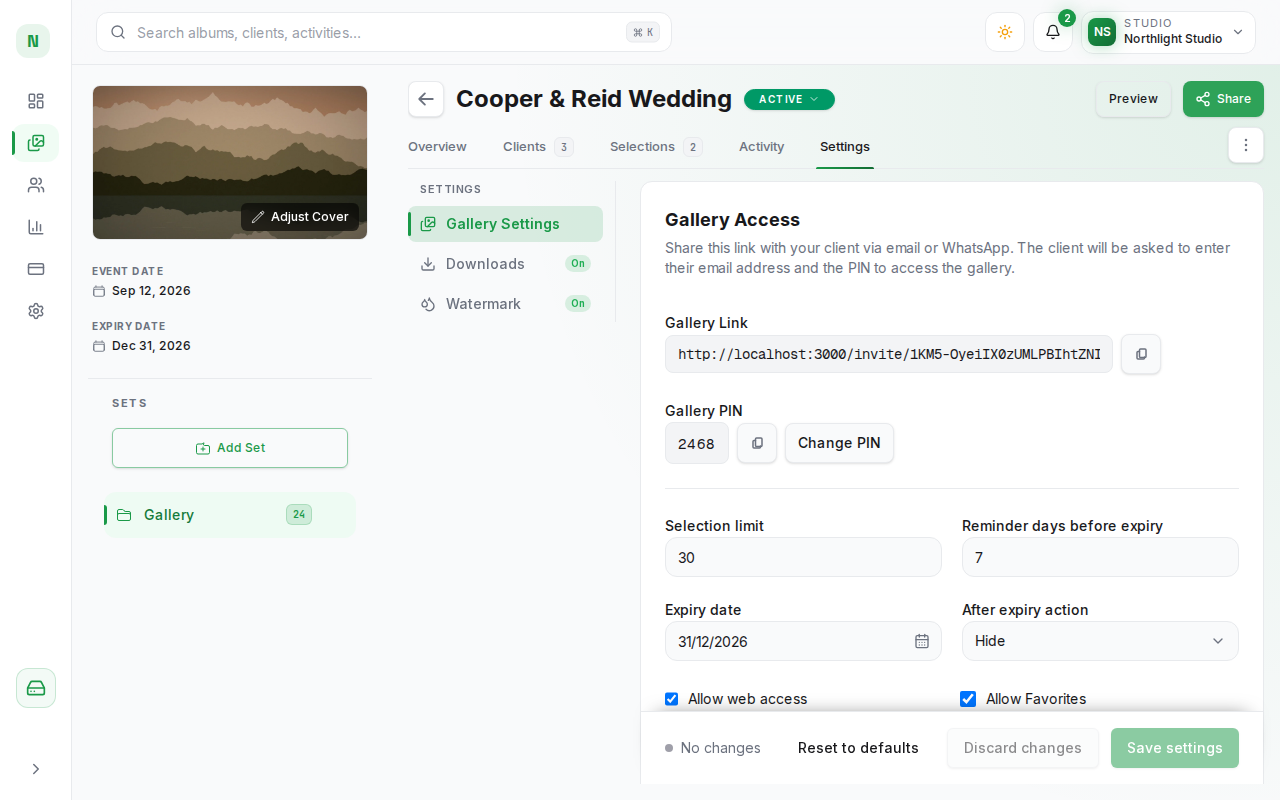
Gallery Link The unique URL generated specifically for this album. This is the link you send to your client so they can open their gallery. Each album has an isolated, unguessable link. Clicking the copy button copies the full URL to your clipboard. Anyone who opens this link and enters the correct Gallery PIN is signed in with the email they type and is added to the album's clients, so share the link and PIN only with the people who should see the gallery.
Gallery PIN A secure PIN assigned to the album. New albums get a randomly generated 6-character PIN of capital letters and numbers (look-alike characters such as 0/O and 1/I are never used, and clients may type it in lowercase). When a client visits the gallery link, they must provide their email address along with this PIN to unlock the photos, so a visitor who has only the link cannot view the gallery.
Change PIN Click the Change PIN button to edit the PIN in place. Type a PIN of 4–16 characters (for example, the client's wedding date) to make it easy for them to remember, or click Generate for a new random PIN, then click Save. The new PIN takes effect when you click Save settings; after that, the previous PIN ceases to work.
Selection Limit
Sets the maximum number of photos a client is permitted to select and submit as their final choice. For example, if your contracted photography package includes 25 retouched photos, enter 25. The gallery UI displays a real-time selection counter to the client and blocks them from selecting more than the limit. Enter 0 to allow unlimited selections. New albums default to 20.
Reminder Days Before Expiry
Specifies how many days before gallery expiration an automated reminder email is sent to the album's clients. For instance, entering 7 (the default) ensures that a reminder is sent one week prior to expiration, prompting the client to finish and submit their selections before access lapses.
Expiry Date
Sets the calendar date when client access to the gallery will automatically terminate. You can select a date from the date picker or input in DD/MM/YYYY format. Setting an expiration date creates urgency for clients to review and submit their selections promptly.
After Expiry Action Defines what happens automatically when the album reaches its expiration date:
- Hide (default) — The album moves to Expired status: clients can no longer open it, but all photos, client information, and selections remain intact in your dashboard. You can set it back to Active or Hidden at any time, which clears the expiry date.
- Delete — The album and its photos are permanently deleted when it expires. This cannot be undone.
Allow web access Permits client viewing through standard web browsers. When it is off (the default for new albums), the gallery is app-only: clients must open it in the PixoProof mobile app, and the web gallery refuses access without altering any album content or settings. The setting notes that web access is not fully protected against screenshots.
Allow Favorites Enables or disables the favorite (heart) icon across gallery photos. When enabled, clients can mark photos to assemble their selection shortlist. Disable this for delivery-only galleries where selections are not required.
Allow Client Notes Allows clients to type specific comments and feedback on individual photos (e.g., "please edit out the microphone" or "convert to black & white"). These notes are sent directly with the selection submission.
Auto hide gallery after submission When enabled (the default), the album switches to Hidden once a client submits their selections, so clients can no longer open it. This locks the client's choices and prevents subsequent changes while you proceed with retouching and final delivery. When turned off, the album stays Active after submission and clients can keep changing their favourites; any change returns their selection to Draft until they submit again.
Gallery design
The Gallery design tab sets how the client gallery looks: the cover, the page background, the accent colour, and the title font. A live preview on the left shows what your client sees, and the options on the right scroll on their own so the preview stays in view.
Preview: Desktop, Tablet, Phone Switch the preview between devices. On Phone, the preview shows the full-screen cover your clients see first on a phone and in the PixoProof app.
Look Six ready-made looks (Classic dark, Light and airy, Warm editorial, Bold modern, Film still, Fine art) set the cover, colours, and font in one click. Pick one as a starting point, then change anything below it.
Cover Choose one of 20 cover designs, from the full-screen Classic to framed, split, and photo-free designs such as Editorial, Passe-partout, Polaroid, Arch, Cinema, and Typographic. Every design has its own phone layout: on phones, designs that put the photo and title side by side stack them, with the photo on top and the title underneath. The cover uses the album's cover photo and the framing you set with Adjust Cover.
Darken the cover photo Shown for designs that place the title on the photo. Keep it on to keep the title readable on bright photos.
Background The colour of the whole gallery page: behind the cover, the header and tabs, and the photo grid. Choose a preset such as Midnight (the original dark gallery), Warm ivory, or White, or enter any colour as a hex code. Text and buttons switch to a readable colour automatically, so a light background gets dark text.
Accent The colour of the selected tab, hearts, and buttons in the gallery. Studio colour uses the brand colour from Settings → Branding.
Title font Modern sans (the original), Classic serif, Editorial italic, or Spaced caps.
Publish look Changes stay in the preview until you click Publish look; clients see the new look the next time they open or refresh the gallery. Reset returns the preview to the published look. Tick Use this look for new albums before publishing to make it your studio default: new albums start with it, while existing albums keep their own look and albums created from a preset use the preset's look.
Downloads
The Downloads tab governs whether clients can download media directly from the web gallery, which resolution tiers are available, and whether full-gallery bulk downloads are permitted.
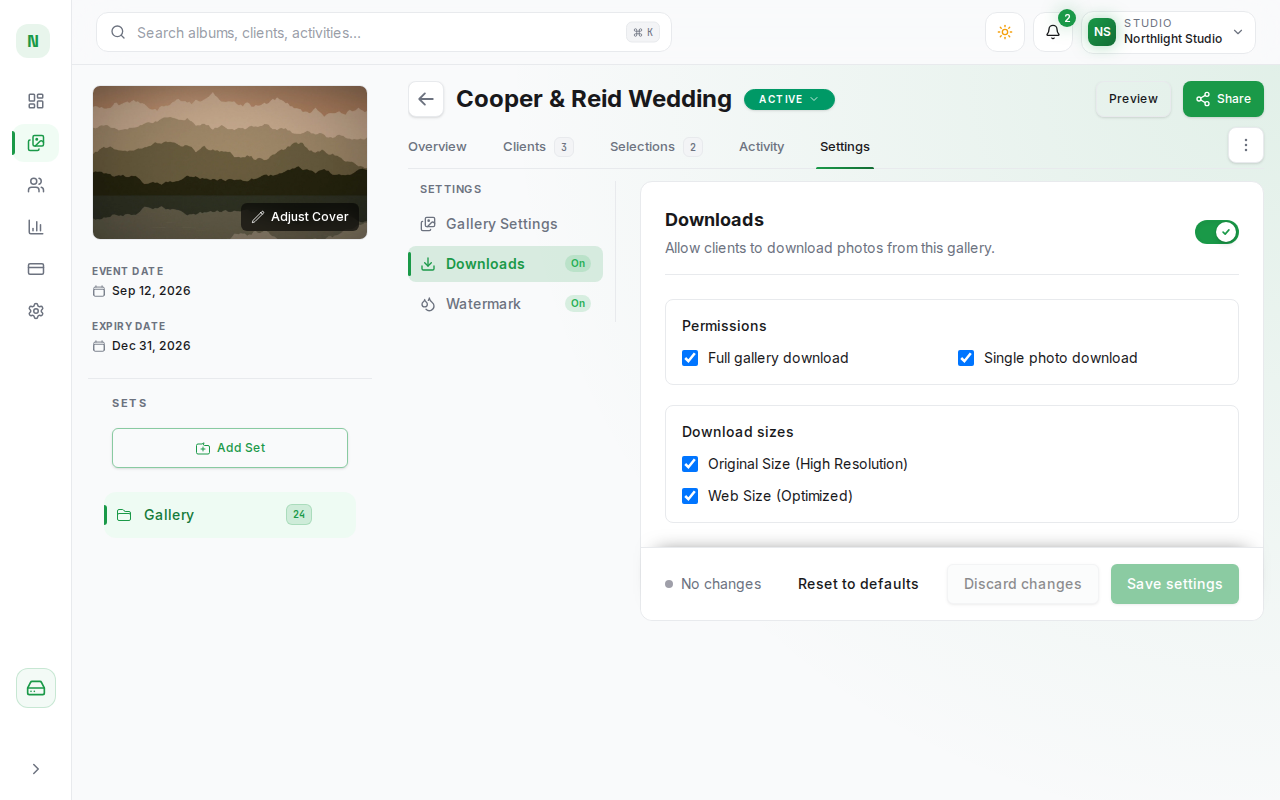
Downloads toggle The switch next to the Downloads heading is the primary toggle for client downloads (off by default). When disabled, download buttons are completely hidden across the entire client interface. When enabled, the Permissions and Download sizes options appear below it.
Full gallery download When enabled, clients are provided a Download All action that packages the gallery's photos into a ZIP download. Use this for final delivery after selections and payments are concluded.
Single photo download When enabled, clients see a dedicated download icon on each photo in the gallery grid and in the photo lightbox. Clients can download specific images one by one.
Original Size (High Resolution) Permits the download of full-resolution image files identical to the files originally uploaded. Recommended for print deliveries and client archival.
Web Size (Optimized) Provides compressed, web-optimized versions of images suitable for social media sharing, smartphones, and quick messaging. This saves bandwidth while delivering sharp screen quality.
Tip: You can enable both Original Size and Web Size simultaneously. When both are enabled, the client gallery shows a Choose Download Size dialog whenever a download is initiated. At least one size must stay selected.
Watermark
The Watermark tab configures automated server-side watermarking. Watermarks protect your proof images against unauthorized screenshotting, sharing, or unlicensed reproduction.
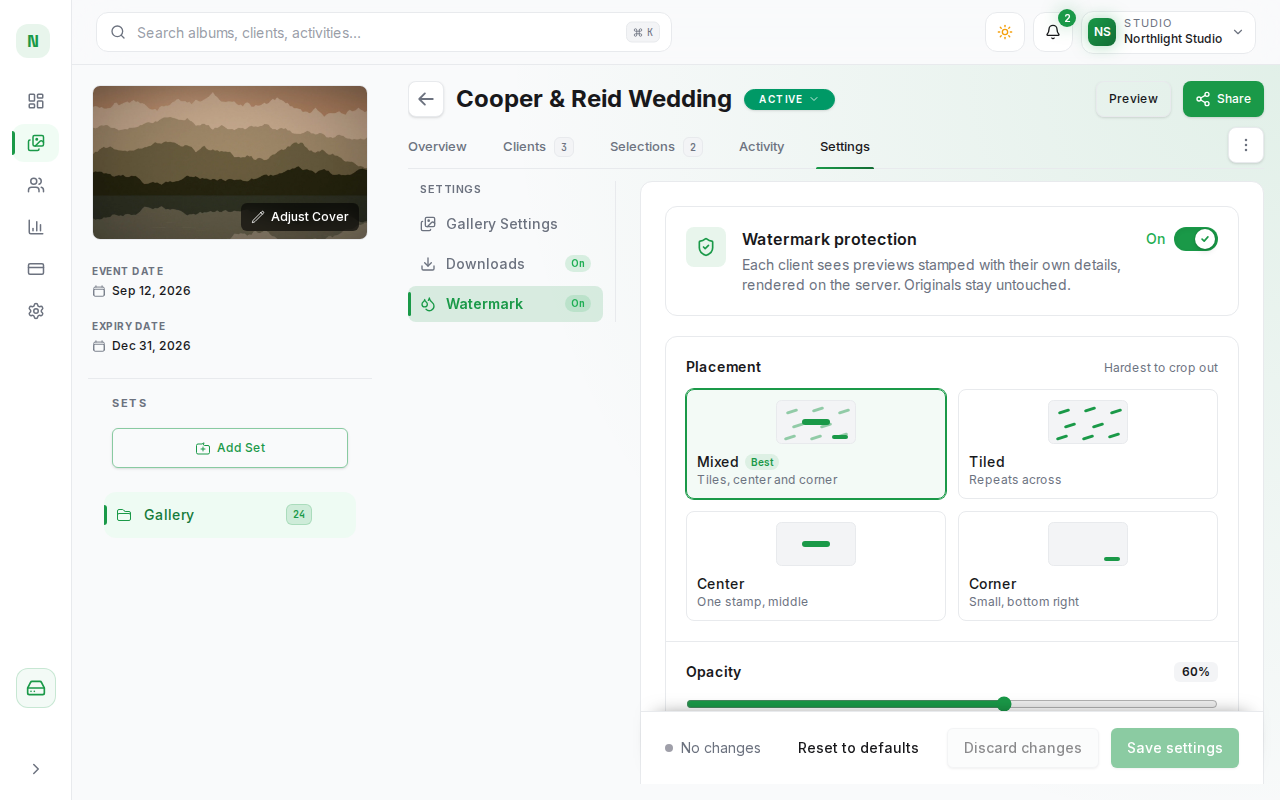
Watermark protection The master toggle (on by default). When active, PixoProof renders the watermark on the server onto every preview served to your clients, stamped with each client's own details. Your original high-resolution uploads remain completely untouched and unaltered.
Placement Controls how the watermark is arranged across each photo:
- Mixed (default) — Combines tiled, center and corner stamps; the hardest to crop out.
- Tiled — Repeats watermark text or branding in a diagonal grid across the entire photo surface.
- Center — Renders a prominent watermark directly in the center of each image.
- Corner — Places a small, discreet watermark in the bottom-right corner of each photo; the easiest to crop out.
Opacity
A slider that adjusts the transparency of the watermark overlay from 0 (Subtle) to 100 (Strong). The panel recommends 40–60%; new albums start at 80%.
Under Stamp on each preview, choose which details are stamped:
Client name Dynamically embeds the recipient client's full name into the watermark text. Because each client gets a personalized watermark, leaked screenshots can be traced directly to their source.
Client email Embeds the client's email address into the watermark overlay, adding a strong deterrent against unauthorized external distribution.
Studio name Overlays your photography business or studio name, ensuring professional branding and copyright attribution on all proofs.
Logo image When enabled, overlays your logo alongside the text details.
Logo upload By default the watermark uses your studio logo from Settings → Branding. Click Upload to give this album its own PNG, JPEG, or WebP logo (up to 2 MB; PNG with transparency works best). Removing the album logo returns the album to your studio logo.